Protected Cultivation of Capsicum
Protected Cultivation of Capsicum
 Capsicum, also known as sweet pepper, bell pepper or Shimla Mirch is one of the popular vegetables grown throughout India. It is rich in Vitamin A (8493 IU), Vitamin C (283 mg) and minerals like Calcium (13.4 mg), Magnesium (14.9 mg) Phosphorus (28.3 mg) Potassium, (263.7 mg) per 100 g fresh weight.
Capsicum is a cool season crop, but it can be grown round the year using protected structures where temperature and relative humidity (RH) can be manipulated. This crop requires day temperature of 25-300C and night temperature of 18-200C with relative humidity of 50-60%. If temperature exceeds 350C or falls below 120C, fruit setting is affected.
Advantages of protected cultivation
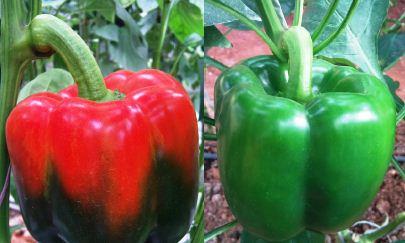
Colored capsicums are in great demand in urban markets. The demand is mostly driven by hotel and catering industry. The traditionally grown green capsicum, depending upon variety and season, usually yields 20-40 tons per hectare in about 4-5 months. In the greenhouse, the crop duration of green and colored capsicums is about 7 -10 months and yields about 80-100 t per hectare. The advantages of protected cultivation are;
- Higher productivity resulting in increased yield
- Provides the better growing environment for plants
- Protects from rain, wind, high temperatures and minimizes the damage of insect pests and diseases thereby improving the quality and yield
- Facilitates year-round production coupled with yield enhancement by 2-3 times compared to open cultivation.
Production practices
1. Selection of Site
 Selection of site for taking up of protected cultivation is a critical step and this has to be done with utmost care. Places having high rainfall and humidity are not suitable for its cultivation, since this encourages many foliar diseases. Also the areas with high wind velocity are not suitable since they are likely to damage the structure and the polyethylene sheet frequently, thereby enhancing the maintenance cost of the structure. Avoid the location or area where heavy rains accompanied with gusty winds are prevalent to avoid damage to the protected structure. Well-drained sandy loam soils having good percolation is most suitable to grow capsicum. The soil pH of 6 to 7 and EC < 1 mm hos/cm is ideal for growing capsicums.
2. Green house structures
The green house is designed depending on the prevailing local climatic conditions. A good number of different types of structures are built for protected cultivation. However, cost effective poly house and net house structures are most commonly used to grow capsicum in our country.
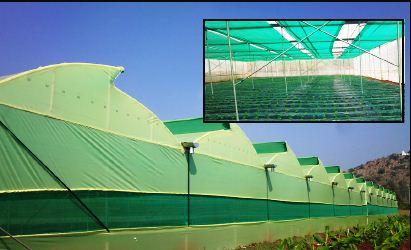
a. Net house (Shade net house)
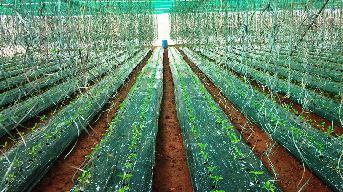
 Growing of vegetables in net house is the cost effective method in many parts of southern states particularly in and around Bangalore. It is mainly due to easy availability of the granite pillars, which can give good strength to the structure and highly durable. Net houses are constructed using granite stone pillars of 12 feet height, 8 inch X 4 inch thickness. These pillars are placed at 2 feet depth inside the soil with concrete cement grouting.
Uneven and sharp edge of stone pillars on the top has to be covered with smooth materials like rubber tubes to avoid tearing of net. A G.I wire grid is provided on the top of granite pillar to support the shade net. Over the GI wire grid, 50% HDPE white shade net is fixed to support another layer of shadenet (green or black with 35% shade), which is movable or retractable. This additional shade net is used during hot summer mid days (Feb-June), sparingly during winter season and whenever the sunlight is more between 11.00 am to 3.00 pm. UV stabilized 40 mesh nylon net is provided on all sides of the net house. Construction of net house costs about Rs.180-200 per sq mtr.
b) Poly house
 Poly house gives better protection compared to net house due to total avoidance of rain water entry into polyhouse; hence leaf diseases can be easily controlled. Yield is normally 15-20 per cent more in polyhouse compared to net house.
GI pipes are used to construct poly house and in some cases farmers use wooden or stone pillars which require less initial investment. Transparent UV stabilized polyethylene film, 200 micron thickness is 4 used for covering the poly house roof. It is provided with retractable or movable shade nets, at about 11 feet height just below the structures from ground level. The sides of the polyhouse are covered with 200 micron thick polyethylene film to a height of 3 feet from the ground level, to have better protection from rain splash. Remaining height of side wall is covered with 40 micron white coloured insect proof net from all the four sides. Construction of poly house costs about Rs.500 per sq. mtr.
Nethouse and polyhouse is provided with an ante chamber with two doors constructed at opposite directions where entry or exit to the poly/ net-house is made through the first door and then after closing the first door, the second door is opened to make an entry into the polyhouse. Care should be taken not to open both the doors simultaneously to avoid the entry of pests into the protected structures. A small concrete trough of 2 meter length, 1 meter breadth and 2 inch depth should be prepared between the two doors of antechamber for facilitating washing legs in the disinfectant solution (Potassium permanganate) to prevent any contamination inside the polyhouse/ net-house.
3. Cultural and Nursery practices
a. Selection of cultivars
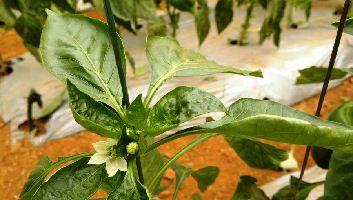
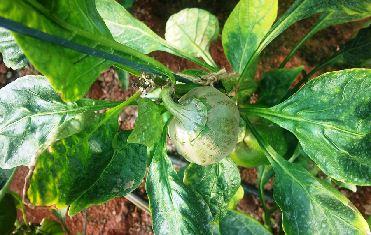
 Growing of capsicum hybrids in green house is useful to obtain continuous and regular flower and fruit setting relatively for a long period of 8 to 10 months. Most of the capsicum hybrids produce green fruits that mature to red, orange or yellow depending on the hybrid. The fruits should have characters such as uniform size and shape preferably four lobes, fruit weight of >150g, uniform coloring after attaining complete maturity, with a better shelf life of more than 5 days under ambient conditions. Selected hybrid should be high yielding, with potential yield of >40t/acre. Hybrids should have shorter intermodal lengths (7 to 10 cm), attaining maximum height of 10 feet in a crop period of 10 months. Popularly grown commercial hybrids in India include Indra, Yamuna (Green); Bomby, Triple star, Natasha, Inspiration, Pasarella (Red); Sunnyez, Swarna, Orobelle, Bachata (Yellow). Capsicum hybrids with high yield potential (>100 t/ha) and having uniform size and shape needs to be selected. Hybrids preferably should have long growing period of 8- 10 months. Fruits should have 6 characters such as four lobes, uniform colour and ripening with better shelf life.
b. Nursery raising
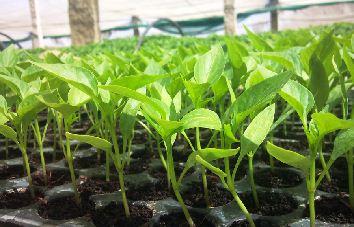 Good quality seeds are required for producing better seedlings. The seedlings are raised in pro-trays of 98 cells or cavities. About 16,000 to 20,000 seedlings are required to plant one acre for which 160-200 gm of seeds is required.
- The pro-trays are filled with sterilized cocopeat and seeds are sown, one seed per cell to a depth of ½ cm and covered with the same media.
- The filled trays are staked one above the other and covered with plastic sheets till germination of seeds.
- Seeds germinate in about a week’s time after sowing. The trays are shifted to net house/ polyhouse and lightly watered. After 15 days of sowing, Mono ammonium phosphate (12:61:0) (3g/L) and 22 days after sowing 19:19:19 (3g/L) solution has to be drenched. The seedlings in protrays are drenched with COC 3g/L before transplanting. The seedlings will be ready for transplanting in 30-35 days.
- Spray imidacloprid @ 0.2 ml/L and chlorothelonil @ 1gm/L before transplanting of seedlings. Always add about 0.3 ml/L of wetting agent per liter of water with each spray of pesticide.
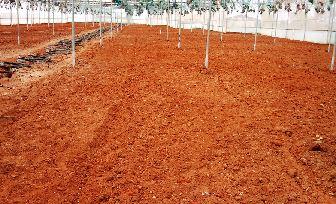
4. Land preparation
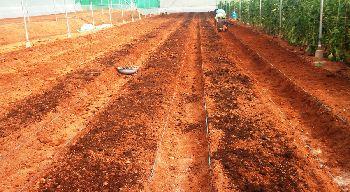 The land should be thoroughly ploughed and soil should be brought to fine tilth. Well decomposed organic manure at the rate of 20-25 kg per sq mtr is mixed with soil. One application is sufficient to grow three capsicum crops successively. Raised beds are formed after bringing soil to fine tilth. The bed size should be 90-100 cms wide and 15-22 cms height. Between the beds walking space of 45 cms to 50 cm need to be provided.
5. Fumigation
 The crop beds are drenched using 4 per cent formaldehyde (@4 L/ m2 of bed) and covered with black polyethylene mulch sheet. While treating with formalin, care should be taken to wear mask, gloves and apron. Four days after formalin treatment, the polyethylene cover is removed; the beds are raked repeatedly everyday to remove the trapped formalin fumes completely, prior to transplanting. Formalin treatment can be repeated after three crop cycles or whenever necessary. Fumigation with formaldehyde helps to minimize the soil borne diseases. Basamid can also be used for soil sterilization.
6. Fertilizer application
A basal fertilizer dose of 20:25:20 NPK is required per acre and is applied to the beds uniformly before transplanting in the form of 80 kg calcium ammonium nitrate, 125 kg super phosphate and 32 kg murate of potash or 40 kg sulphate of potash.
7. Application of neem cake and Microbial Bio-control Agents
Fifteen days before transplanting, neem cake has to be enriched with bio agents like Trichoderma harzianam and Pseudomonas lilacinous. Neem cake of about 200 Kg is powdered and slightly moistened. Trichoderma harzianam, Pseudomonas lilacinous and Paecilomyces chilmdosporia each of two kg are mixed thoroughly to the neem cake. The mixture is covered with wet gunny bags or dry grass and left for 8-10 days. Avoid direct exposure to sunlight and rainfall. After 10 days, this enriched mixture of neem cake and bio-agent along with 600 kg of neem cake has to be applied uniformly to the beds for an area of one acre. This is highly useful to reduce the problem of soil borne pathogens and nematodes. Azospirillum or Azoctobacter or VAM which is a nitrogen fixing bacteria can also be applied to the growing bed.
8. Laying of drip line
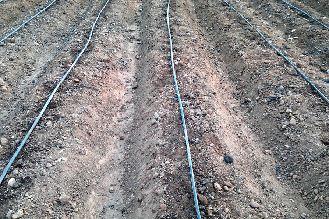 Place one 16mm inline drip lateral at the center of the bed having emitting points at every 30 cm interval with discharge rate of 2 ltr/hr or 4 ltr/hr. Run the drip system to check each emitting point for uniform discharge before covering the beds with polythene mulch.
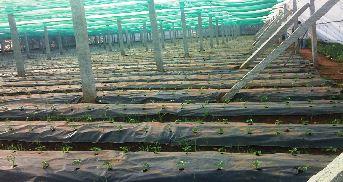
9. Mulching and Spacing
 Black polyethylene non-recycled mulch film of 30-100 micron thick, 1.2 m wide, is used to cover the planting beds. Holes of 5 cm diameter are made on the polyethylene film as per the recommended spacing (45cm x 30cm). The planting beds are covered with the film by securing the edges of the sheet firmly in the soil. Mulching practice conserves water, controls weeds, reduces infestation of pests and diseases and results in higher yield and good quality produce.
10. Transplanting
![]() The planting beds are watered to field capacity before transplanting . Seedlings of 30-35 days old are used for transplanting. Care should be taken to see that no damage is occurred to roots, while taking out the seedlings from individual cells of portray. Seedlings are transplanted into holes made in polyethylene mulch film at a depth of 5 cm. After transplanting, seedlings are drenched with 3 g/L copper oxy chloride or 3 g/L captan or 2 g/L copper hydroxide solution to the base of seedlings at the rate of 25-30 ml per plant. Watering 10 the mulched beds daily during afternoon by using hose pipe for a week continuously is essential to avoid mortality due to heat trapped by mulch sheet.
The planting beds are watered to field capacity before transplanting . Seedlings of 30-35 days old are used for transplanting. Care should be taken to see that no damage is occurred to roots, while taking out the seedlings from individual cells of portray. Seedlings are transplanted into holes made in polyethylene mulch film at a depth of 5 cm. After transplanting, seedlings are drenched with 3 g/L copper oxy chloride or 3 g/L captan or 2 g/L copper hydroxide solution to the base of seedlings at the rate of 25-30 ml per plant. Watering 10 the mulched beds daily during afternoon by using hose pipe for a week continuously is essential to avoid mortality due to heat trapped by mulch sheet.
11. Pruning
Capsicum plants are pruned to retain four stems. The tip of the plant splits into two at 5th or 6th node and are left to grow. These two branches again split in to two giving rise to four branches. At every node the tip splits into two giving rise to one strong branch and one week branch. The pruning is done after 30 days of transplanting at an interval of 8 to 10 days, resulting in bigger fruits with better quality and high productivity. The capsicum plants can also be pruned to two stems and same level of yield can be maintained.
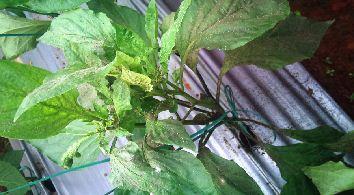
12. Training
The main stem of plant is tied with four plastic twine to train along and tied to GI wire grid provided on the top of the plants. This is practiced after four weeks of transplanting. The new branches and plants are trained along the plastic twines.
13. Drip irrigation and Fertigation
Drip irrigation is given to provide 2-4 liters of water per square meter per day depending on the season. Water soluble fertilizers are given through fertigation for entire crop growth period, starting from third week after transplanting . Fertigation is to be given twice a week as recommended in the table below.
| Sl.No | Required fertilizer | Fertilizer dosage per fertigation (kg/ac |
|---|---|---|
| 1 | 19:19:19 | 4 kg |
| 2 | Potassium Nitrate | 1.5 kg |
| 3 | Calcium Nitrate | 1.5 kg |
Capsicum crop is sprayed with water soluble fertilizers like potassium nitrate and calcium nitrate at every 3 week interval after 2 months of transplanting @ 3g/ l as foliar application.
14. Integrated Pests and Diseases Management
Capsicum being relatively long duration (9-10 months) crop in polyhouse, the plant parts (vegetative, floral & fruit) are more exposed to adverse effect on the yield, quality and market value of the produce. Hence their identification and management at right stage of the crop should be given importance. The major pests and diseases, their symptoms and their management in capsicum are given below.The major focus has been given on adoption of integrated approach in managing pests and diseases, that help to reduce the pesticide load, cost of chemicals and avoid the resurgence of pests and diseases.
a. Insect Pest and Management
i. Thrips
 Symptoms: Thrips cause upward curling of leaves, sucks sap and reduce leaf growth, plant growth, yield and market value of produce. It also reduces leaf area and hinders absorption of nutrients and water by the plants. Increased infestation leads to blackening and drying of leaves and irregular fruit bearing.
Management: Remove affected plant parts including leaves, flowers and fruits. Keep the plots clean by removing all the dropped plant parts. Spray Pongamia oil (5-8 ml/L) or Neem seeds kernel extract (NSKE 4%) or Pongamia / Neem soap developed by IIHR (7gm/L) or fipronil (1ml/L) or chloropyriphos (2 ml/L) or acephate (1.5g/L) or Imidacloprid (0.5ml/L). Drenching of soil using chloropyriphos (4ml/L) or imidacloprid (0.5ml/L).
ii. Mites
 Symptoms: Young larvae and adults feed on leaves, bud and fruits, suck sap from plant parts which in turn causes downward curling of leaves. The size of leaf, fruit and plants gets reduced, fruit and flower 13 drop affecting the market value of the produce. This pest infestation increases with increased temperature coupled with high humidity.
Management: Remove the pest damaged plant parts including leaves, flowers and fruits and spray Pongamia oil (5-8 ml/L) or Pongamia / Neem soap (8-10 g/L) or dicofol (2ml/L) or wettable sulphur (2ml/L) or abamectin (0.5ml/Ll) or ecomite or propargite or chlorophenapyr (1ml/ L) or fenazaquin (1 ml/L).
iii. Aphids
 Symptoms: Nymphs and adult aphids suck sap from leaf veins and younger leaves resulting in reduced plant growth and decrease in yield. Its infestation not only causes curling of leaves but also spreads viral diseases.
Management: Keep a close watch on the plants at regular intervals for aphids’ infestation. Spray Pongamia / Neem soap (8-10 g/L) or imidacloprid (0.5ml/L) or thiomethoxam (0.5g/L) or dimethoate (2ml/L).
iv. Fruit borer
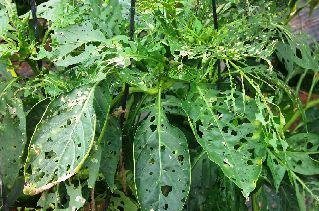 Symptoms: Fruit borers are very active during night. The adults lay eggs on fruits, flowers and leaves in large number and the nymphs that 14 come out of eggs, feed on fruits and leaves causing heavy destruction of crops and severely affects the quality of the produce. Whenever night temperature is low, coupled with cool and high humidity the infestation is increased. Since eggs are laid in group, the larva also feeds gregariously on leaves at one place, which can be easily identified and destroyed.
Management: Pick and destroy nymphs and adult insects. Generally eggs are laid and hatch in groups, which is easy to identify from a distance. Hence they should be identified and destroyed immediately. Spray thiodicarb (1ml/L) or carbaryl (3g/L) or indoxcarb (1ml/L) or rynaxypyr (0.5ml/L) or chlorofenfur (1.5ml/L) or fipronil (1ml/L). In addition to the sprays, grownup adults should be subjected to methomyl baiting, which is a safe, healthy and effective practice.
Methomyl baiting procedure: Prepare a mixture of 10 kg paddy husk and 1 kg jaggery solution and store for 6-8 hrs. Add ½ kg methomyl to the mixture. Small sized balls of mixture are made which are spread near the root zone of the plants and also around poly house/ nethouse to avoid infestation of fruit borer. It should be applied during night hours, and the domestic or pet animals should not be allowed to move in and around net/ polyhouse over night.
v. Nematodes
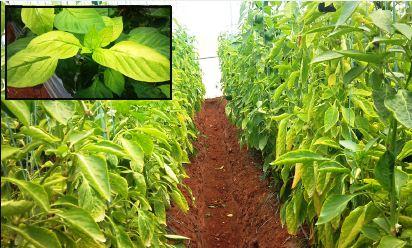 Symptoms: Nematodes are commonly seen in solanaceous crops when grown 3-4 times continuously in the same field. Initially yellowing of leaves can be observed followed by reduction in leaf size, count and 15 drastic reduction in size of fruits. When infected plant is uprooted and observed, small and big nodes filled with large number of nematodes nodules can be observed on roots depending on the level of infestation.
Management: Go for crop rotation with non-solanaceous crops like marigold, sweet corn and cabbage to avoid nematode. Bio-pesticides enriched Neem cake (as explained earlier) is to be applied @ 800 kg/ acre 4-5 days before transplanting to the beds. Apply carbofuran (furadan) granules @ 20kg /acre at the time of planting. Keep a close watch on nematode infestation of the plants, particularly in 2nd and 3rd crop. The insecticides should always be mixed with spreader or sticker while spraying. The plants from top to bottom should come in contact with spray for better result and care should be taken to compulsorily cover the entire body with full clothes, mask, gloves and aprons while spraying.
b. Diseases and Management
i. Damping off
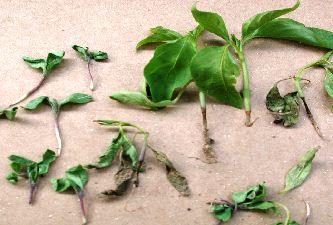 Symptoms : Infection takes place at the base of the young seedlings just above the ground level which leads to wilting and 16 later death of seedlings. Any damage caused to seedlings while transplanting can also lead to damping off or seedling wilt besides fresh infection in main field or infection that is carried from nursery.
Management: Drench carbendazim (1g/L) or metalaxyl MZ (2g/L) or copper oxychloride (3g/L) or captan (3g/L) drenched to the base of the plant at about 25-50 ml/plant.
ii. Powdery mildew
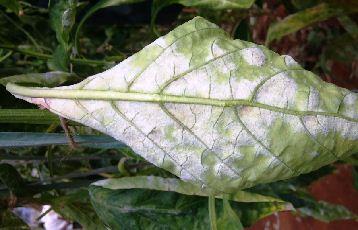 Symptoms: The disease initially appears as tiny yellow spots on surface of leaf and powder like material on the lower surface leading to a powdery growth covering the entire lower surface of leaf which leads to drying and dropping of leaves at later stages. The disease reduces growth of leaves and fruits leading to low quality and quantity of the produce.
Management: Spray Pongamia /Neem oil (7ml/L) + sulphur WDG-80 (2g/L) or wettable sulphur (2g/L) or hexaconazole (0.5ml/L) or myclobutanil (1g/L) or dinocap (1 ml/L) or azoxystrobin (0.5ml/L) or penconazole (0.5ml/L) or flusilazole (0.5ml/L).
iii. Cercospora leaf spot
 Symptoms : Cercospora appears initially as tiny yellow spot on leaf surface leading to increased dark grey spots which spreads on entire leaf resulting in dropping of leaf.
Management: Spray chlorothalonil (2.5g/L) or mancozeb (2.5g/L) or carbendazim (1g/L)
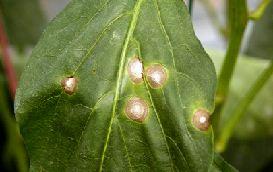
iv. Phythopthera
Symptoms: This disease appears during fruiting and flowering stage resulting in tiny oil like spot on leaf surface resulting in rottening and blackening of plants. Later plant weakens and dies in 2-3 days. Heavy and continuous rainfalls coupled with high humidity favour 18 disease appearance and its quick spread. Phythopthera disease is relatively more severe in net houses which may lead to 40-80 per cent crop damage.
Management: Spray copper hydroxy chloride (3g/L) or bordeaux mixture (1%) or metalaxyl MZ (2g/L) or dimethomorph + mancozeb (1 g + 2.5g/L) or fosetyl aluminium (2g/L) or azoxystrobin (0.5ml/L). Severely infected plant parts should be destroyed. It is better to avoid capsicum cultivation in severely affected net-houses.
c. Viral diseases
Symptoms: Viral diseases are tramsmitted through aphids and thrips leading to upward and downward curling of leaves with yellow spot in the middle of leaf and sometimes on fruit also. Heavy infestation leads to dropping up of leaves, stunted plant growth and reduces quality and quantity of fruits. Virus affected fruits are unmarketable.
Management: Grow nursery beds under nylon cover (50 mesh), proper management of aphids, mites and thrips which acts as disease transmitting vectors and disposal of diseased/infected plants, control infestations of viral diseases.
d. Pesticide residues
 In poly house cultivation of capsicum, high plant density, mono cropping of susceptible genotypes and increased labour activities make 20 plants more prone to pests and diseases like mites, thrips, whiteflies, powdery mildew and nematodes. Thus, chemical control of pests become necessary and often several sprays of insecticides /fungicides are given even at near harvest stages of the crop. In a polyhouse the volatilization and wind drift losses of pesticides are lesser which may result in higher initial deposits of pesticide residues on the plant and soil, while degradation of pesticide residues may be higher due to higher average temperatures. Also, a polyhouse generally reflects back 43% of the net solar radiation incident upon it allowing the transmittance of the “photosynthetically active solar radiation” in the range of 400-700 Nm wave length. Thus there will be lesser UV radiation incident upon the crop in a greenhouse than in open field in the same area, especially if a shade net is also used. Since most pesticides are UV-degradable there is likelihood that pesticides will persist for a longer time. It is thus important to evaluate the persistence of pesticide residues in these crops under polyhouse conditions so that safe waiting period for important pesticides used in polyhouse cultivation may be established.
15. Harvesting and yield
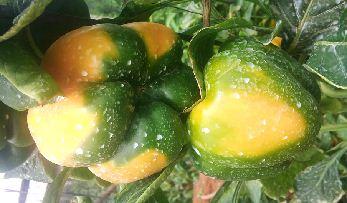
 Early morning hours are best suited for capsicum harvest. Green capsicum can be harvested at 55 to 60 days after transplanting, yellow capsicum at 70-75 days whereas red capsicum at 80-90 days. Fruits can be harvested once in 3 to 4 days. Yellow and red fruits can be harvested when they have gained 22 50-80 per cent of the colour development. After harvest fruits should be kept in cool place and avoid direct exposure to sunlight. The fruits should be handled carefully by adopting clip harvest technique and scuffing should be minimized. The average yield of capsicum per acre is 30-40 tons.
17. Post Harvest Management
i. Grading
 Capsicums are highly perishable in nature and lose water very rapidly due to shrivelling, drying & softening of the fruit which accelerates deterioration. Good quality fruits are selected and are cleaned with clean, dry and soft cloth to remove water drops or wetness or powdery residues of pesticides/ fungicides, if any, found on the fruits. Good quality fruits with 2-3 lobes weighing < 150 gram are graded as B grade fruits. Good quality fruits with uniform maturity, color, shape, size and free from defects spots, bruises or decay and pesticide residues should be used for packing while fruits showing signs of sunscald, mechanical or insect damage, or diseased misshaped and damaged fruits should be discarded. Generally fruits with 3-4 lobes weighing 150 gram and more are grouped as A grade fruits.
b. Packing and storage
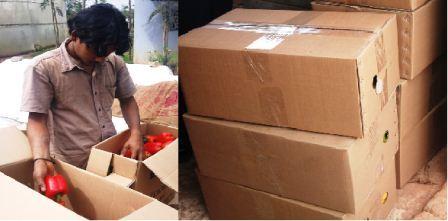 Graded fruits should be packed in CFB cartons (5/7 ply thick) in single or in multiple layers with paper shreds as cushioning material for long distance transport. The optimum conditions for storage of capsicum is 7- 8°C temperature with high relative humidity (90 to 95 %) where the shelf life of fruits can be extended for 2 to 3 weeks. Capsicums are sensitive to chilling injury below 5° C which leads to softening, pitting, and decay of fruits. Capsicum fruits should not be stored with other ripening fruits especially mangoes, papayas and tomatoes to prevent faster ripening and spoilage.
c. Shrink wrapping technology of capsicum
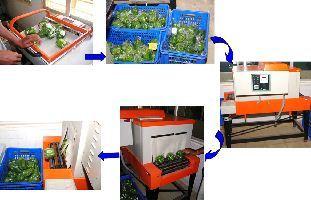 Capsicum fruits are shrink wrapped individually. Freshly harvested capsicum fruits are sorted/ graded, washed thoroughly with water or disinfectants , surface dried, stalks are trimmed, and individual fruits are packed loosely in flexible film before passing through shrink tunnel (150- 170°C) for 8 to 10 24 seconds. Thus shrink wrapped fruits are collected, packed and stored at room temperature or at optimum storage conditions. Film gets shrink wrapped tightly around each fruit and acts as another layer of protective cover. This technology helps in extending the shelf life of fruits, which can be used to transport for long distance market and also for export. Shrink wrapping technology is useful only when it is coupled with low temperature storage, as otherwise it aggravates spoiling of fruits. It is advantageous over normal storage as it reduces weight loss, maintains firmness and reduces chilling injury, blemishes and secondary infection of fruits. Under low temperature storage (8-12°C), the shelf life of shrink wrapped fruits can be extended upto 6 weeks. It also delays ripening & senescence and thereby extends storage life of fruits. It provides improved sanitation where spoiled ones can be discarded easily and also facilitates for consumer appeal variety and brand identification.
17. Special Tips to Achieve Higher and Quality Yield
- The organic manure/compost applied to the soil should be enriched with Microbial Bio-control Agents like Pseudomonas fluorescens, Paecilomyces lillacinus, Trichoderma harzianum etc. and biofertilizers like, PSB, Azospirillum, Azotobacter, etc. to enhance soil health.
- Any damage of net or polysheet in the structure should be immediately repaired to prevent entry of pests and diseases.
- The polyhouse/ nethouse should have double door system which is 25 the safest way to prevent the entry of pests and diseases. The doors should be constructed preferably away from roadside.
- Seedlings raised in protrays have to be transplanted within 30-35 days after sowing on the main raised planting beds (1/2 ft above the ground level).
- Regular pruning has to be followed to retain two-third healthy branches and retain one fruit with good shape and size in each branch and remove deformed fruits, if any, at a very early stage.
- Branches are properly tied with plastic twine and other end tied to the supporting GI grid to give strong support and to avoid breakage of branches/ fruits.
- Drip irrigation and fertigation schedules should be followed regularly.
- Avoid pests and disease incidence for adopting prophylactic measures. Use proper and recommended quantity and dosage of pesticides and insecticides to control the incidence.
- Maintain hygiene condition in green house and dispose off the rotten, fallen and infected plant debris/ fruits and regularly, preferably everyday during evening hours, after completing all the operations of the day. Use clean plastic bags to collect and carry these materials to the place of disposal, to avoid the spread of infection.
- Care should be taken not to pinch the apical bud and protect it from the mite infestation.
- Botanicals, Microbial Bio-control Agents, biological agents and biofertilizers should be used as an integrated pest, disease and nutrient management practice.
- Yield should constitute 85-90 percent of A grade fruits (3-4 lobes, 150-180 gms). Deformed and irregular shaped fruits are pinched out at younger stage and fruits with 50-70 per cent colour should be harvested, graded and packed properly.
Source :Technical Bulletin, IIHR
Last Modified : 3/4/2020